Equinox followed right on the heels of the ridiculous, engine-crushing Nuts toward the end of 2001. This implies that the former - a Doom II thirteen-level mapset for limit-removing source ports - had already been in development for quite some time. Both were created by the mysterious B.P.R.D. and while Equinox is much closer to traditional Doom level design there are enough instances of large areas and mixed monster packs to suggest that full-on enemy infighting was more woven into the author's Doom DNA than the casual silliness of Nuts (created to test the /idgames upload process) suggests. Looking at this and B.P.R.D.'s subsequent releases, including the magnificent yet maligned "Mucous Flow", it's clear that the author has enjoyed a considerable legacy of influence with today's level designers.

The PWAD has no accompanying framing story or anything to anchor down its context beyond its presentation within the game world. The title belongs some a corporation or a facility having apparent aspirations toward interplanetary travel ("International Space Association"). Holograms of both Saturn and Jupiter feature in what I assume are its terrestrial headquarters. Equinox also has some knowledge of matter teleportation which, as with the UAC, may be the ultimate reason for why it's been overrun by monsters. The player uses this technology to visit the facility's three major branches - research, warehouse, and hangar - while eradicating what you discover to be distinctly extraterrestrial enemies. I sort of think that they come from Mars, based on the final sky, but if so it's a not-to-scale solar system.

B.P.R.D. may not have an explicit narrative tying the mapset together but much of the connective tissue is created by using a hub-like presentation. MAP02 is a small teleporter facility, fielding a transporter for each of the set's major areas the latter of which are broken into two-map combos. MAP02 returns as MAP05, MAP08, and MAP11, bookending the larger chunks of the facility until the action spills out of the confines of the hub, leading to the final act. You'll see some slight changes in the appearance of the hub as you progress that echoes the ongoing invasion raging through the installation along with some umbral upgrades.
On the one hand the action in the pseudo-hub is absolutely formulaic. There's an initial panic as you deal with the handful of enemies in the foyer followed by the rigmarole of checking out each teleporter closet. Also, while Equinox begins on the visual slam-dunk of the opening vista, none of its adventurous wonder carries over into the interstitial maps. On the other hand they're just framing devices for the actual action and excepting the final instance are fairly easy to blaze through. Sure, it would have been sweet to see B.P.R.D. build up the atmosphere with more glances of awesome architecture. That's clearly not his style here, though, and I'm sure I've been spoiled by Back to Saturn X.
As to the author's approach the first thing that hit me and pervaded the rest of the set was levels composed of big, tall spaces, sort of like the huge scale of Michael Krause's maps. You get your first taste in MAP01 from your initial look at Equinox's effects but you'll see it again and again in the non-hub entries if only in small bursts like the canyon / staircase of MAP03. MAP07, the second half of the warehouse venture, is the quintessential example of B.P.R.D.'s vertical exaggeration. The second third of the level is one huge, winding tunnel and looks more akin to a Mario Kart track, emptying into a surreal network of crates stacked as tall as a metropolitan skyline.
These wide open spaces dovetail in with B.P.R.D.'s encounter design which shares some of Nuts's DNA. Though one of Doomworld's Top 10 Infamous WADs seemed more like a lark it reveals a lust for monster infighting when juxtaposed with Equinox. So many of these encounters run much smoother if you utilize crowdsurfing and -shaping. The echelon of gene troopers lying in wait in MAP04 begins this trend but it hits several peaks in the warehouse portion of MAP07 as well as the airfields of MAP09. Heck; I doubt that some of them are feasible without infighting, even while carrying over your supplies between levels. Certainly not the alien ambuscade of MAP13, a cavernous confine bearing more than a passing resemblance to death arenas of the present day. Such is less about the spectacle of slaughter, though, and more continued grace under pressure as projectiles periodically pelt the player from the perfidious precipice of the pitch-black periphery.
While infighting features heavily it isn't the only trick in B.P.R.D.'s book. I bemoaned the lost opportunity of the hub levels but the author has enough atmosphere for all of them in MAP10 where you serve as the stowaway on a classic U.F.O.. The soundtrack complements your apprehensive adventure against an all-arch-vile aggregation that's just as carefully rationed as the available ammo. If you don't mind indulging in survival horror and almost certain Faustian frustration I suggest giving it a try from pistol start as the difference in how you can approach the map will be huge when plowing through continuously.
There's a handful of aesthetic changes, altering the usually consistent Doom action experience. Most of these are sound replacements associated with attacks be they player weapon noises or monster-produced projectiles. There are a few new reverberations for Romero's head that are highly obnoxious and distorted, leading me to wonder whether they're playing back correctly. You'll also see a couple of new weapon sprites for the pistol and chaingun though nothing has changed as far as how the weapons actually work.
Equinox is another dazzling Doom tour of Things Not Yet Seen from start to finish with a handful of minor roadbumps along the way. It's understandable if unfortunate that Nuts got all the press when the author uses tricks as cool as the escaping space ship and such airy, abstract architecture. I know I've seen my share of silver techbases but none have been quite like these or their alien counterparts. I'm looking forward to the rest of B.P.R.D.'s catalog... even if it IS inundated with jokeWADs.


EQUINOX
by "B.P.R.D."
| MAP01 | |
|---|---|
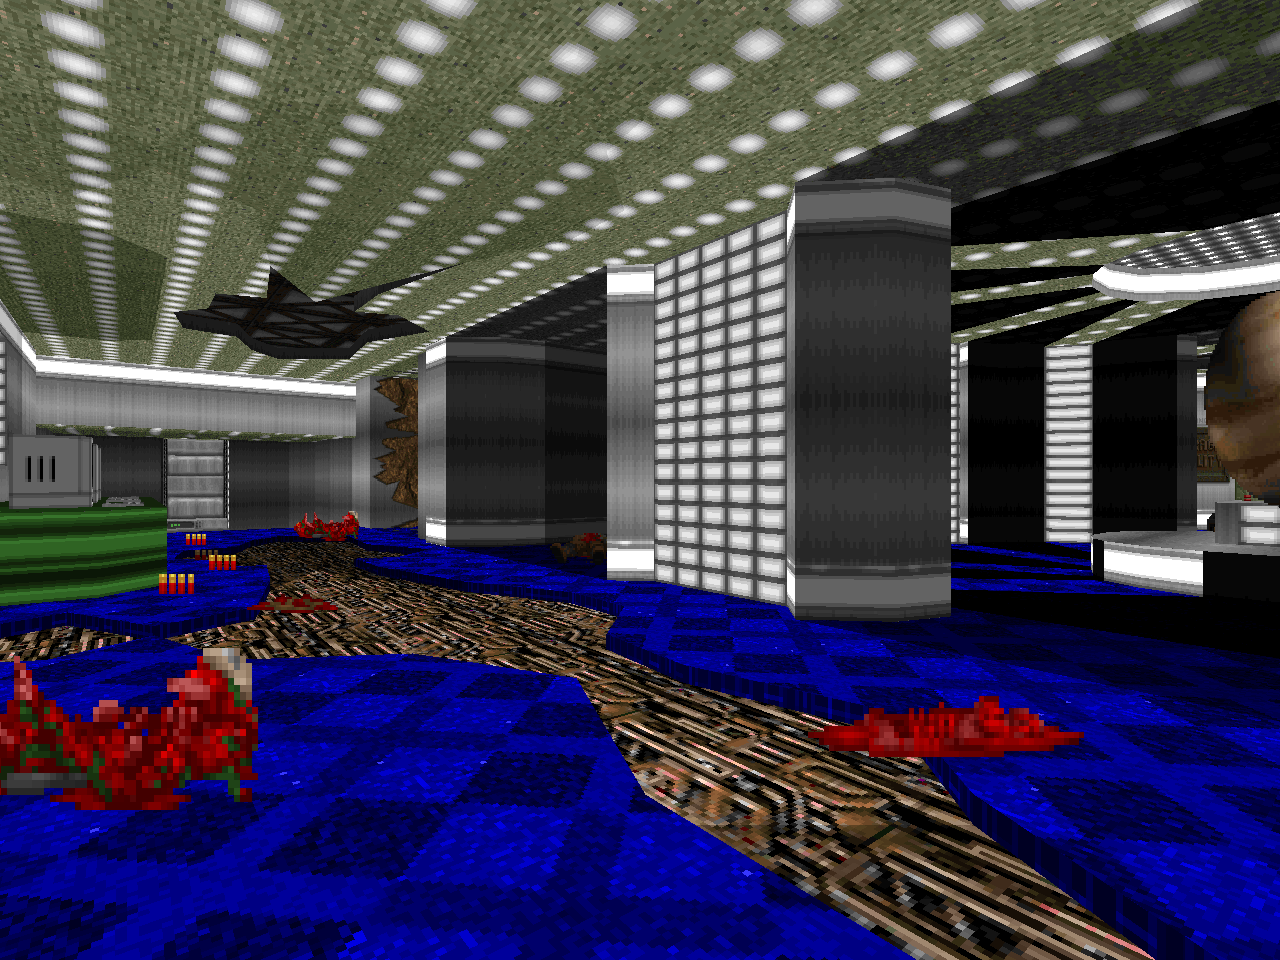
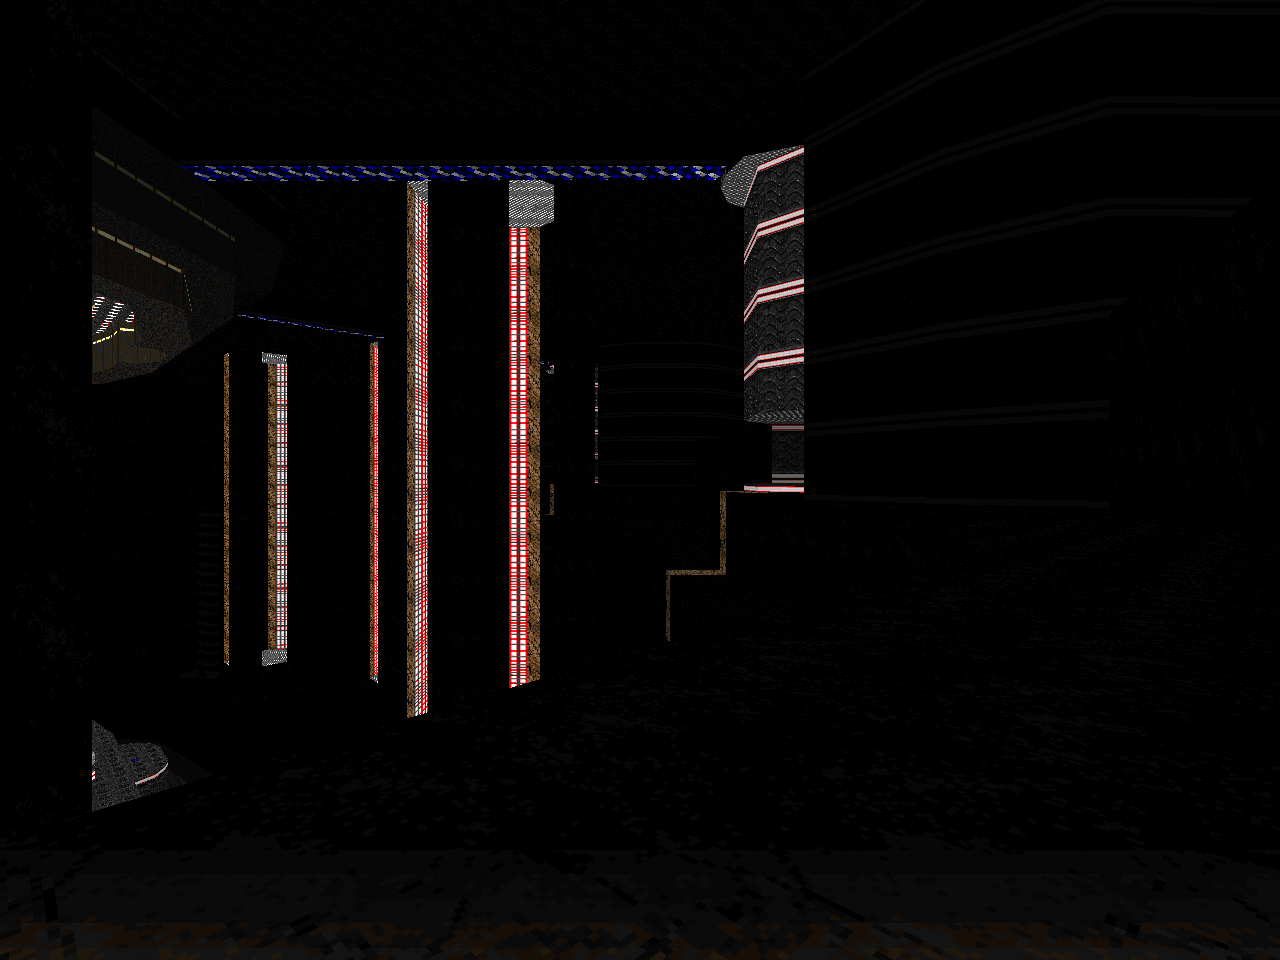
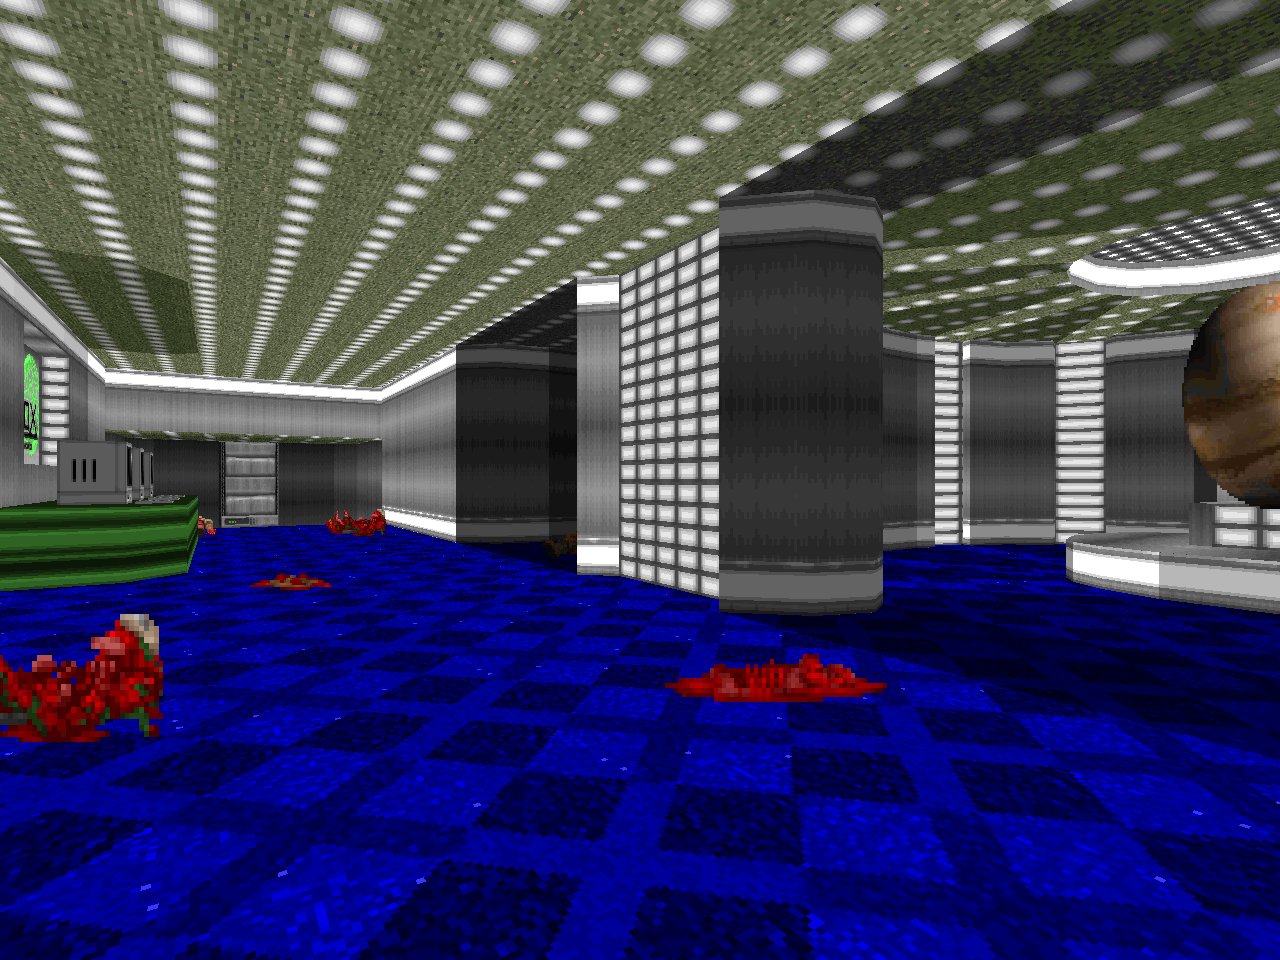
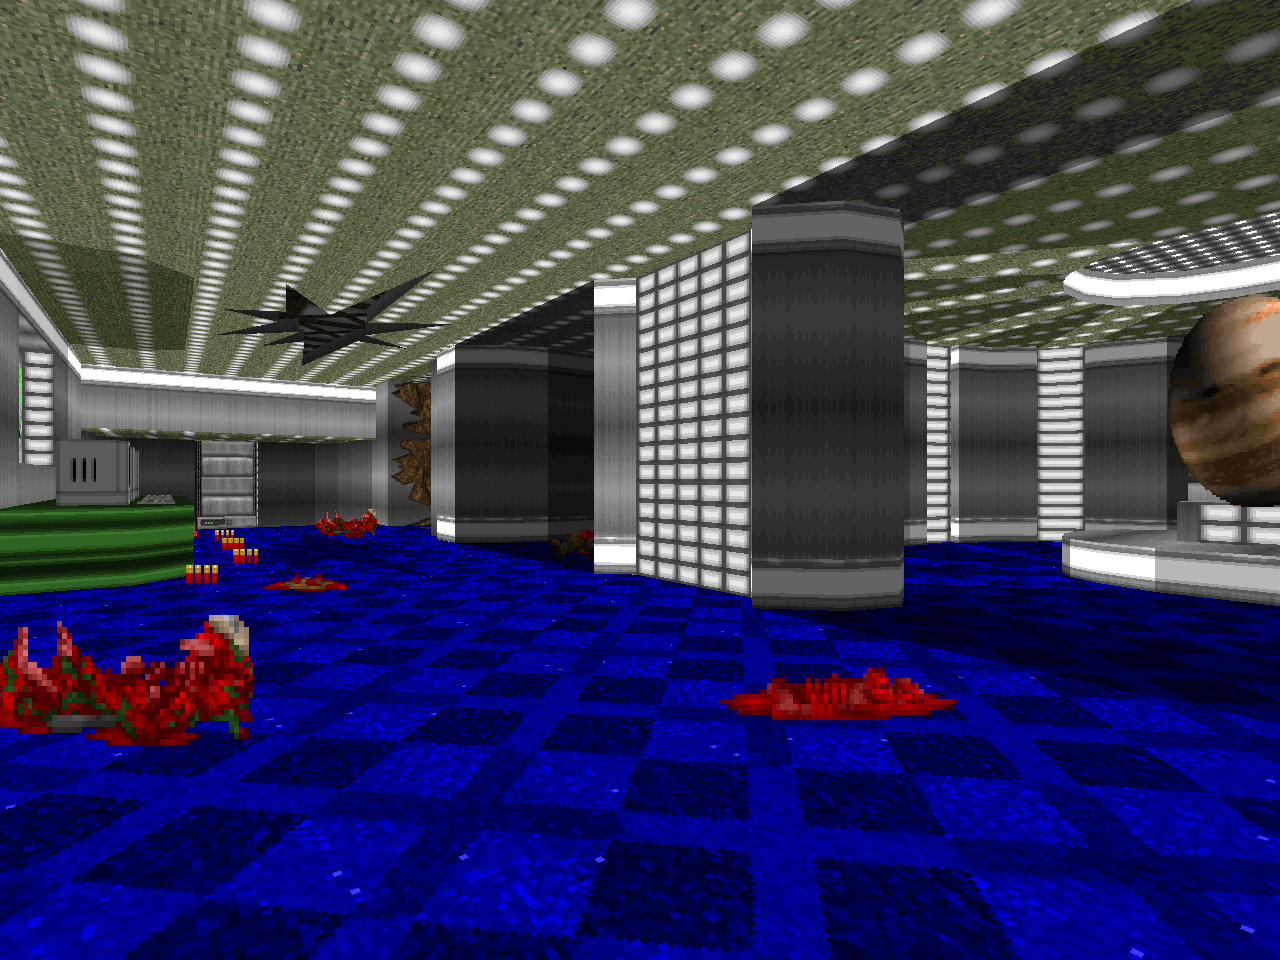
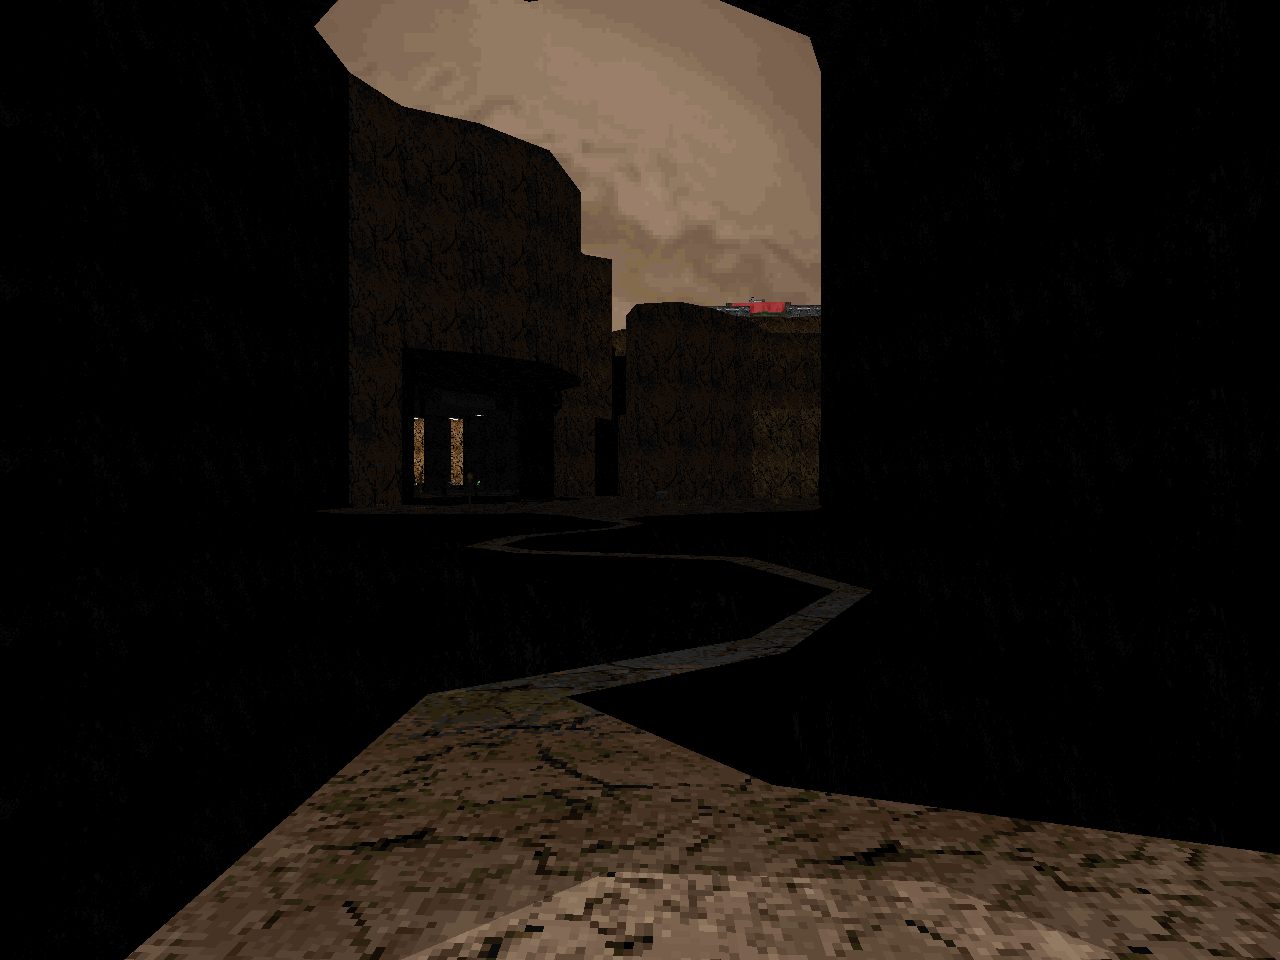
| The main portion of this level looks phenomenal, from the opening look at the facility's front door past the hologram of Saturn and a little Easter egg involving some buried treasure. I like that B.P.R.D. has a long secret chain involved in grabbing the soul sphere and I also appreciate being encouraged to mountain goat to many of the level's surfaces. The combat is pretty basic vs. E1M1 monsters, most of which appear in monotypical monster packs. It's not so noticeable in the main hall but makes for uninspired combat in the east / west side paths. The lighting is excellent; the stark contrast of shadows vs. the bright white and silver makes the atmosphere. I do enjoy how the author tells small stories by using the marine and monster corpses coupled with the battle scars baked into the textures. | 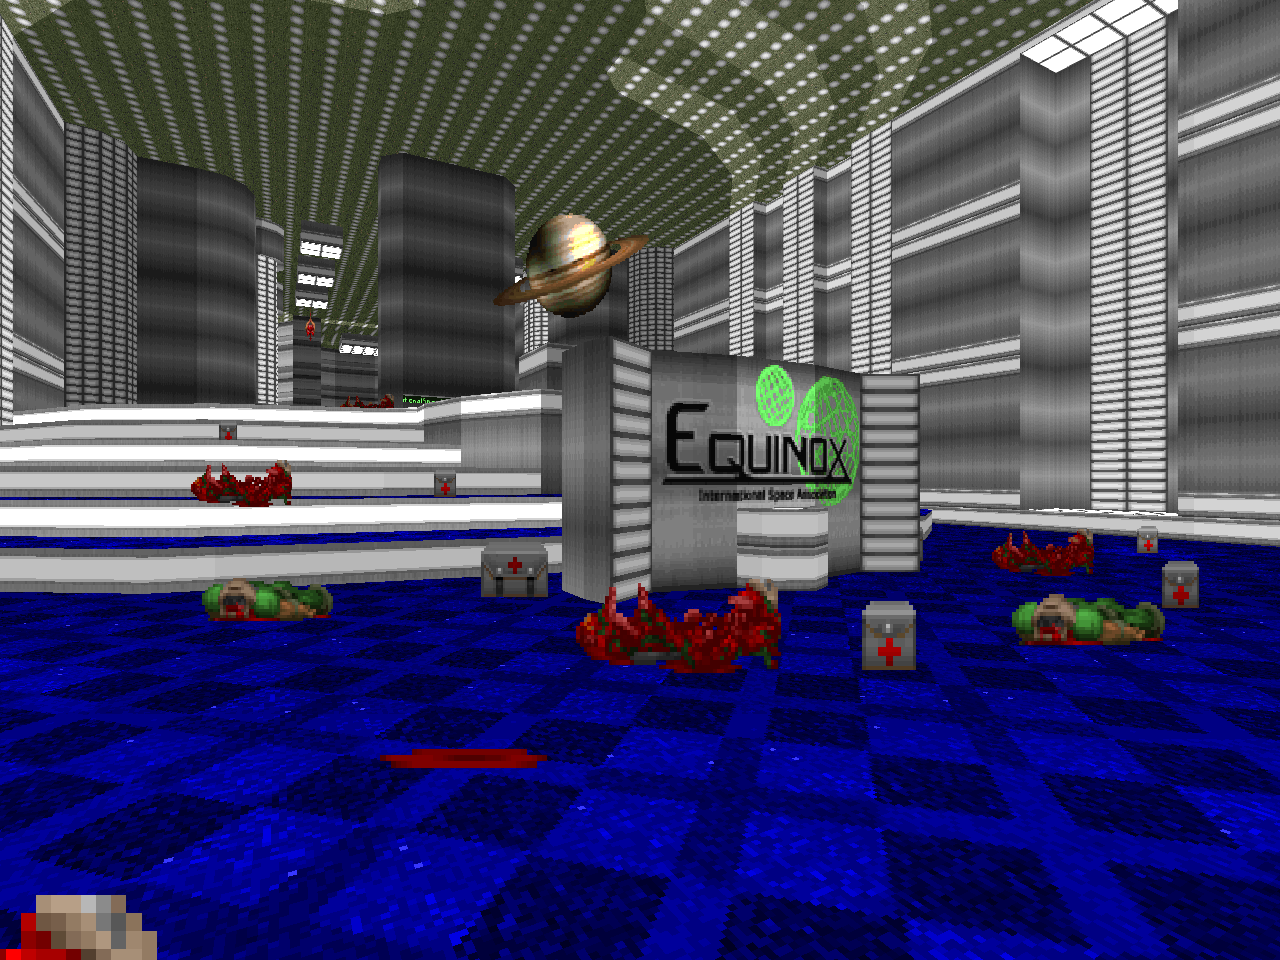 |
| MAP02 | |
|---|---|
 | We appear to have a hub-like presentation! The small but open layout might make for a few surprises as you battle it out between the imps and zombies. The teleporter pads, not so much. The texturing uses the same themes but since it's a small annex the architecture is far-removed from MAP01. |
| MAP03 | |
|---|---|
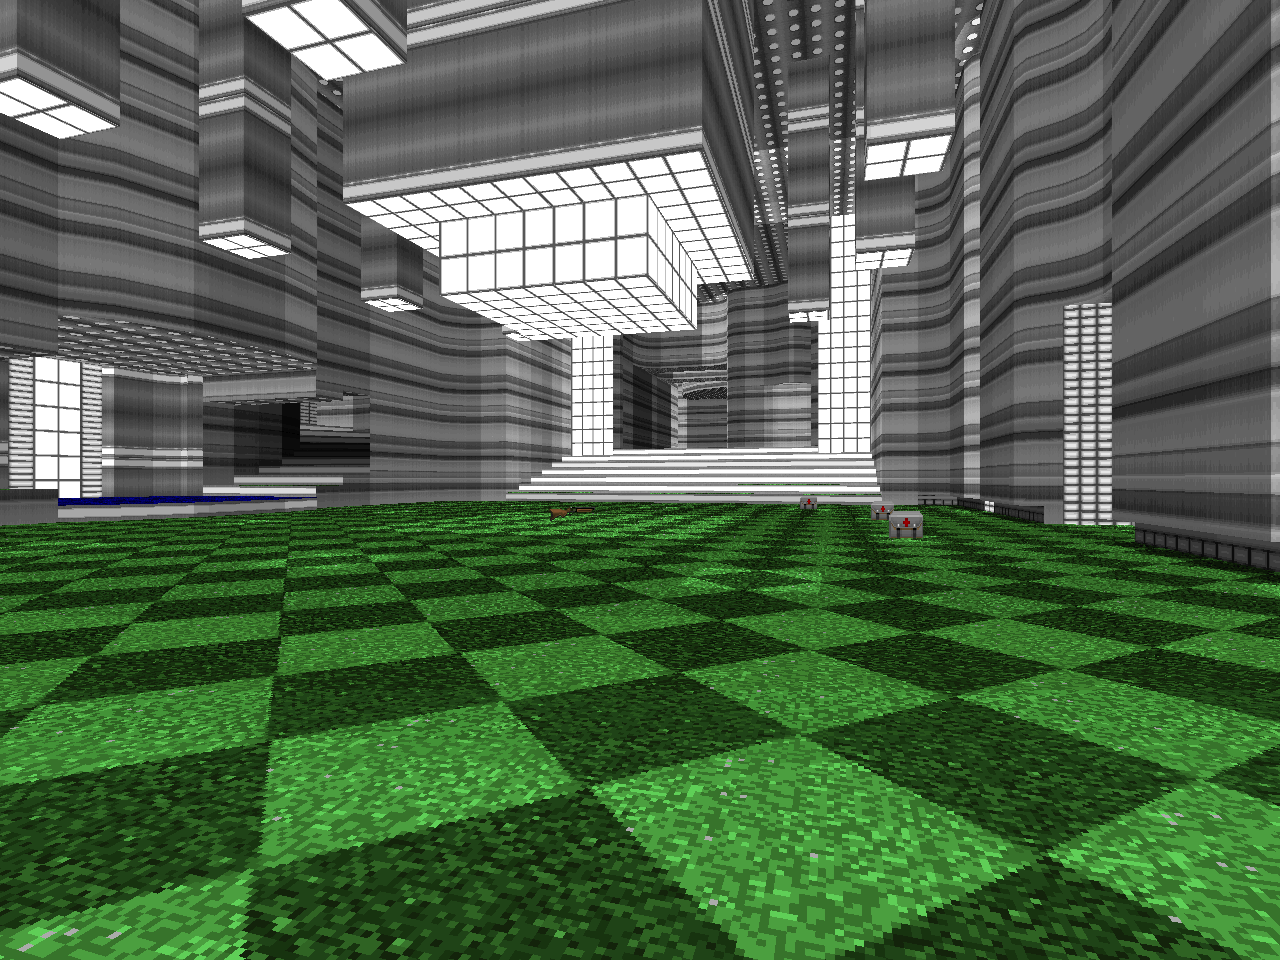
| A ruined section of the facility where some kind of cataclysmic event has ripped open a gaping chasm that just happens to cut across your route. B.P.R.D. does better with these huge areas and the transition from big hallways to crags a plenty goes relatively smoothly, aided by some careful custom textures. I was pretty excited to fight demons at first but the air duct-like crawl dominating the northwestern portion of the level drags it down by hiding pinkies around every corner. If you know ahead of time you can beeline through the labyrinth to snag the chainsaw and then return to clear the remainders without blowing all your shotgun shells. You'll want to save all the ammo you can since the pain elementals make their first appearance, too, alongside some lesser annoyances. The detailing in a few of the tech areas is pretty sweet; I particularly like the room immediately preceding the Minosian maze. |  |
| MAP04 | |
|---|---|
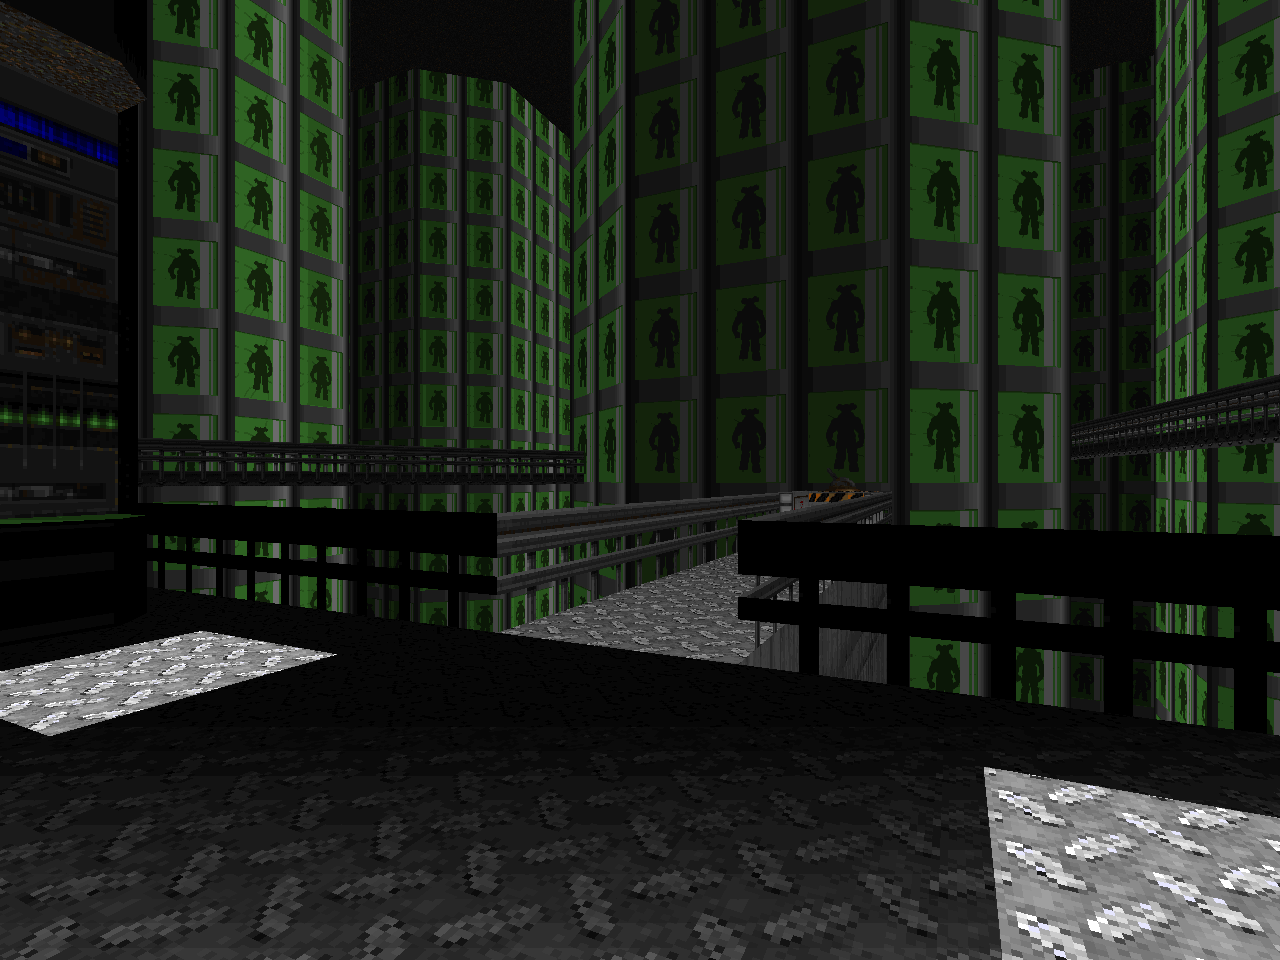
 | The toughest level so far, largely due to the opening battle, a mosh pit of imps and shotgun guys with a few arachnotrons occupying critical points. It's tough to get a foothold because of the crossfire but after a handful of tries I managed to get on to the rest of the map. The author widens out the tunnel bits and moves on to chaingun guys and revenants as your pitfalls for the northeastern section that starts and finishes a Cyberdemon showdown... while cramming a blur sphere down your throat! Ammo gets pretty tight in the final stages, especially given that mancubus wall. If you can make it to the last big ambush and survive long enough you'll have all the munitions you need to take this to close. The visual with the hundreds if not thousands of vat-contained demons is quite powerful and I like the self-destruct sequence, even if the sound is ear-splitting. |
| MAP05 | |
|---|---|
| Return to MAP02. The new monsters (demons, commandos, and a Hell knight) and relatively limited ammo make for a much tighter experience. The layout, however, is basically the same... plus a little cave offshoot, no doubt caused by all the underground explosions. | 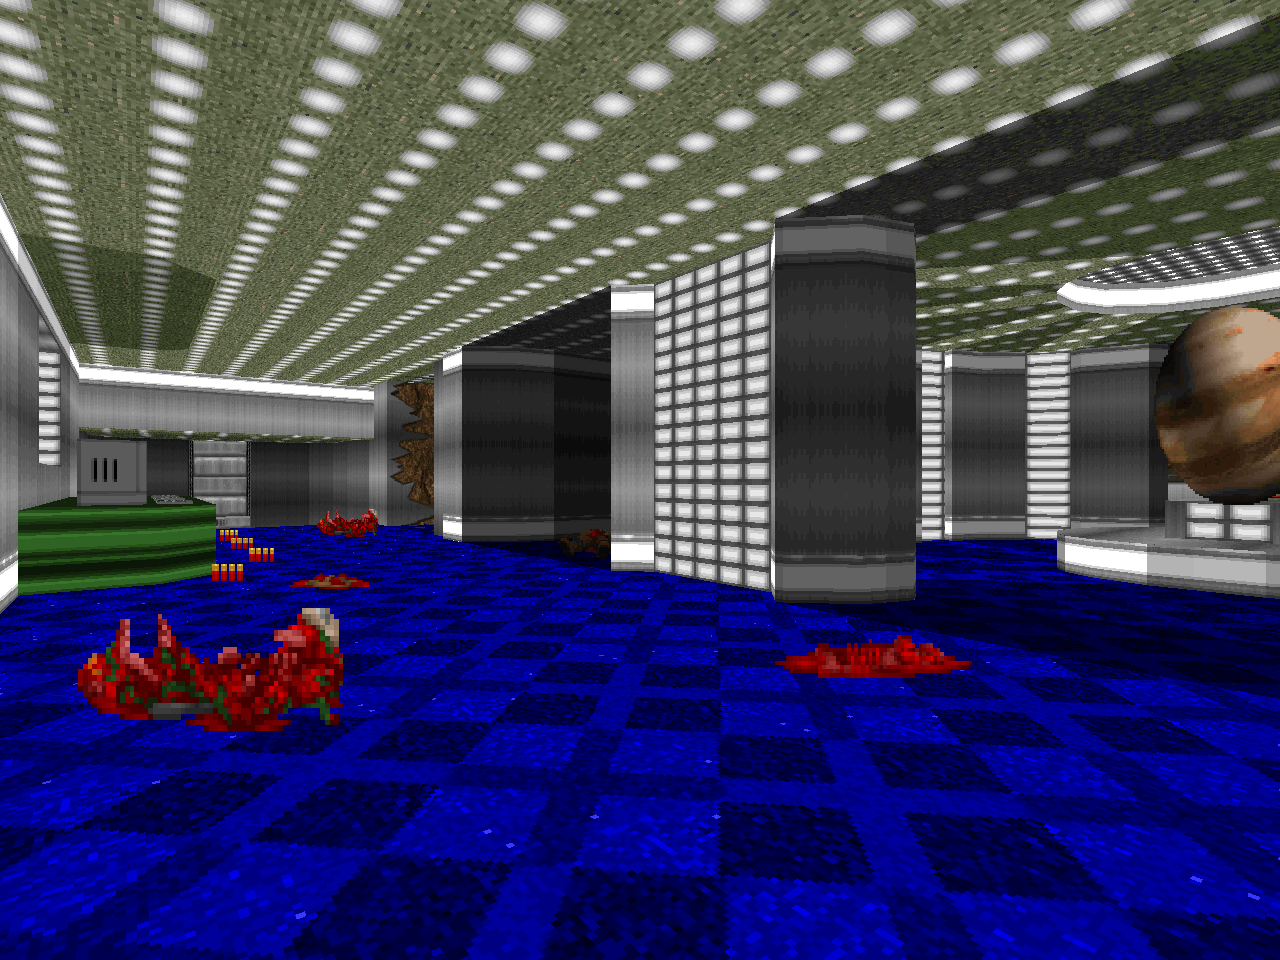 |
| MAP06 | |
|---|---|
 | This is a pretty cool level with a handful of nice setpiece fights. Just don't miss the combat shotgun, available at the very beginning of the level, or you'll spend a lot of time doing legwork with the basic shotgun. This makes the multi-faceted outdoor brawl to the immediate east drag that much longer. Either way it's my standout fight since it's got imps up top, demons on the bottom, and a wave of lost souls, cacodemons, and one pain elemental as the major spoiler. The big spiral leading up to the eastern tower is not nearly as interesting, though it does remind me of Xasermaps, or maybe Joshy's imitation of a Xasermap. It's just cannon fodder up until you're exposed to the mancubuses on the top. The Equinox stamped crates inside the tower are kind of cute; woe to the player that blitzes in, though. |
| MAP07 | |
|---|---|
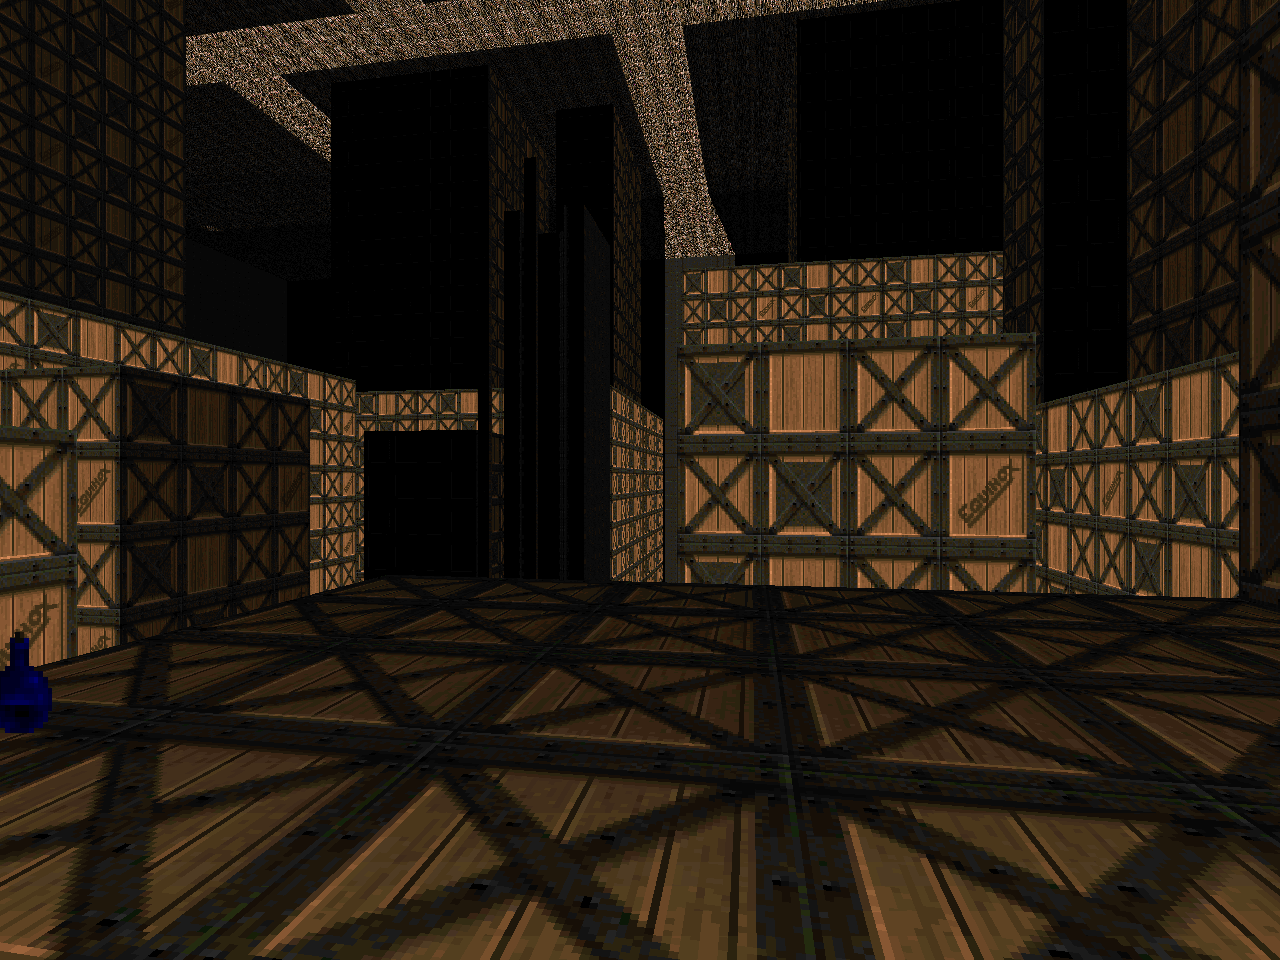
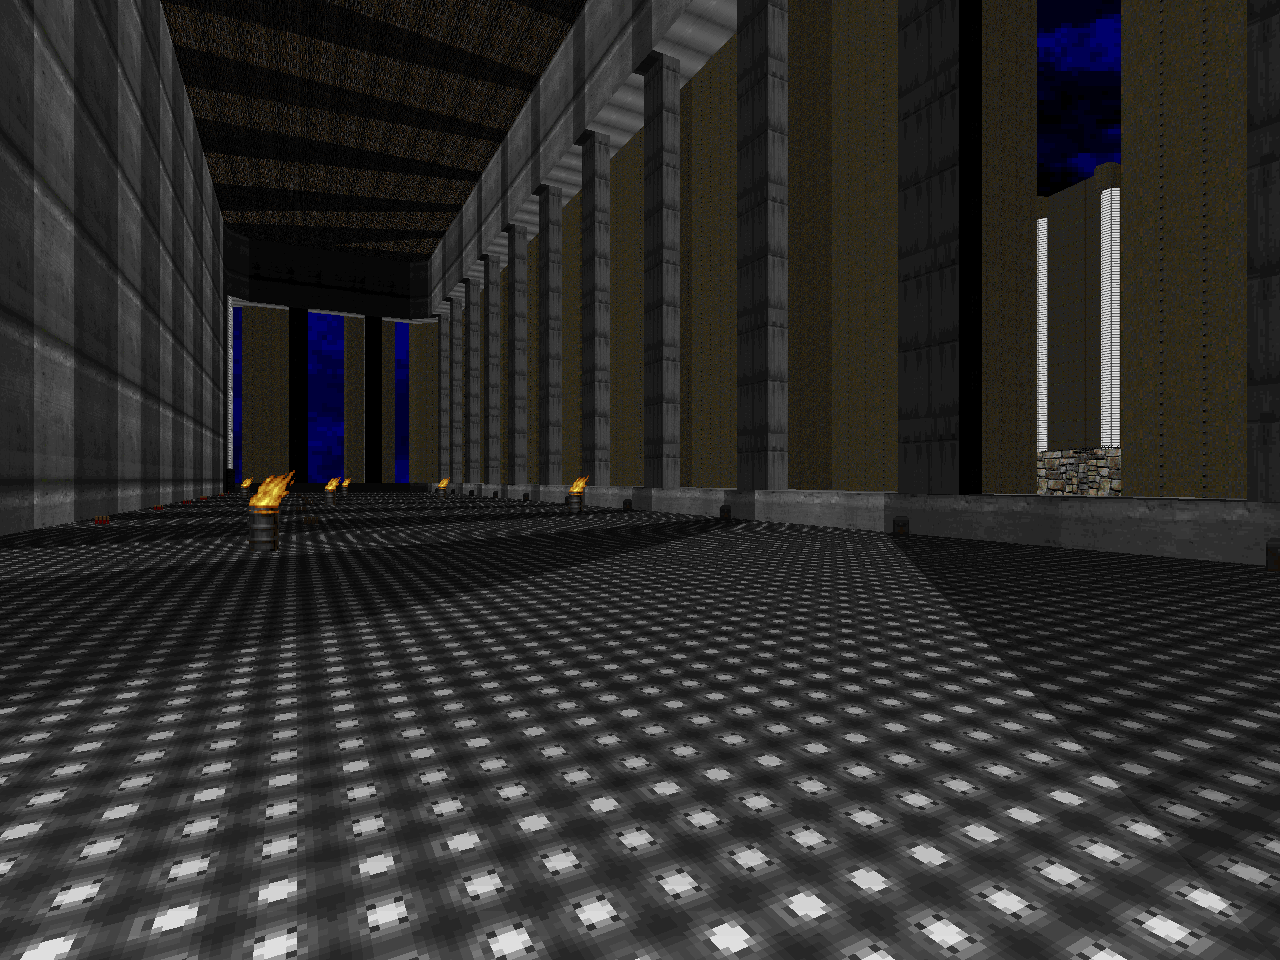
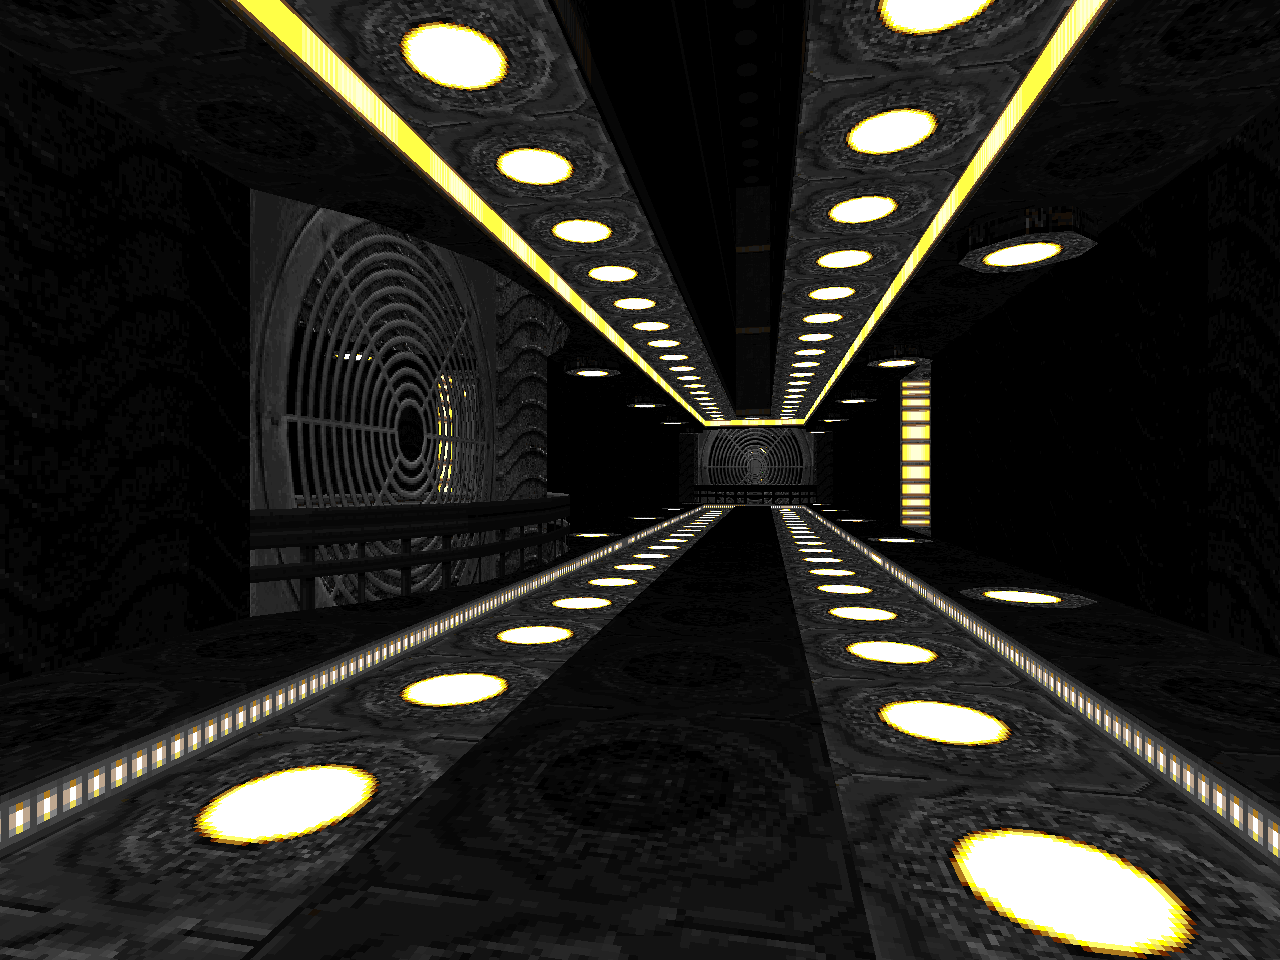
| Big fights, big prizes. The warehouse district is abnormally spacious, taking the level's scale to surreal heights once you move into the second third of the map. The first should be fairly familiar consisting of spread-out groups of monsters in wide, open spaces. While not always exciting infighting is pretty much the best way to clear out any heterogeneous group of enemies since you'll want to save all the ammo that you can. The dark passage linking the beginning area to the warehouse is equal parts frustrating - because it's so dark and there's pretty much no ammo besides a few boxes of rockets - and fun once you've embraced your inner Shepherd, carefully weaving between conspicuous barrels and past not-so-obvious monsters in a fairly irregular layout. Panic is far more prevalent in the warehouse proper since there are a ton of beasties packed amongst the crate towers and they'll take their time filing out. The transition to the top of the skyscraper stacks is a wonderfully abstract moment. I like the way B.P.R.D. debuts the arch-vile. |  |
| MAP08 | |
|---|---|
 | Return to MAP05, this time with more battle damage... and, refreshingly, cramming a plasma gun and a handful of cells into your grubby mitts. The hi-tech tenderizer neutralizes the larger threats lurking about but ammo is just tight enough that you'll find yourself trying to remember what flavors of sardines are packed into the teleporter chambers. |
| MAP09 | |
|---|---|
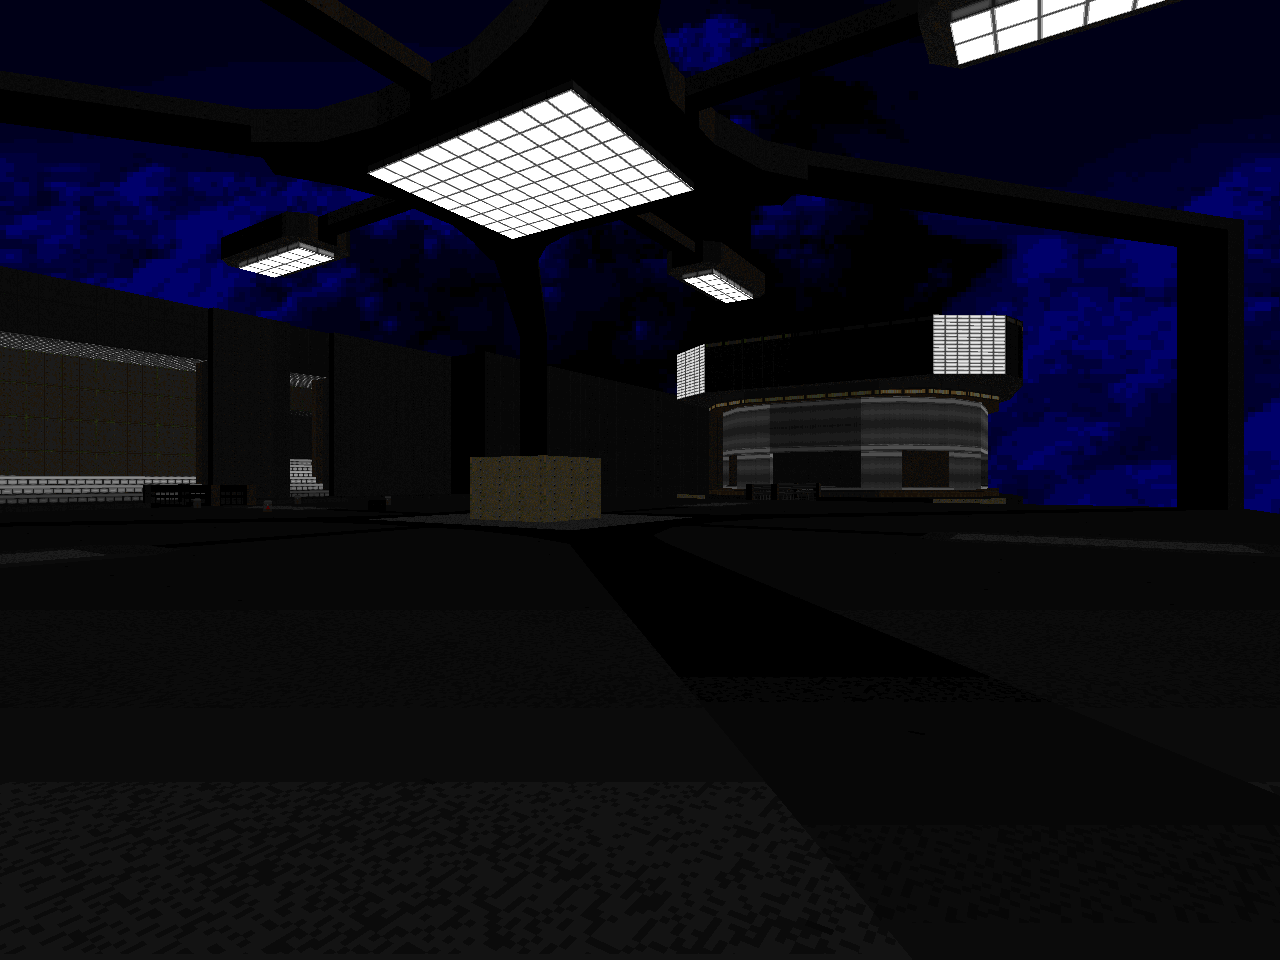
| I like the appearance of the hangar / airfield. The running lights, beacons, and control tower look great and there are a few awesome tricks. Still on the eye-candy side of things, the end-of-level flying saucer which starts to take off as you approach it. Wicked cool! More for gameplay, a secret that looks impossible but requires a mundane speedrunning trick. The encounters in this level basically boil down to two big circle-strafe slaughters. It's a little more complicated since you'll do well to do some crowd-shaping as you tease out the first group and the huge variety of projectiles makes the second just as dangerous but it's Slaughter 101. I dunno how much ammo you would have playing with carry-overs by this point but it won't be enough scratch to make it through without orchestrating some demon-on-demon action. | 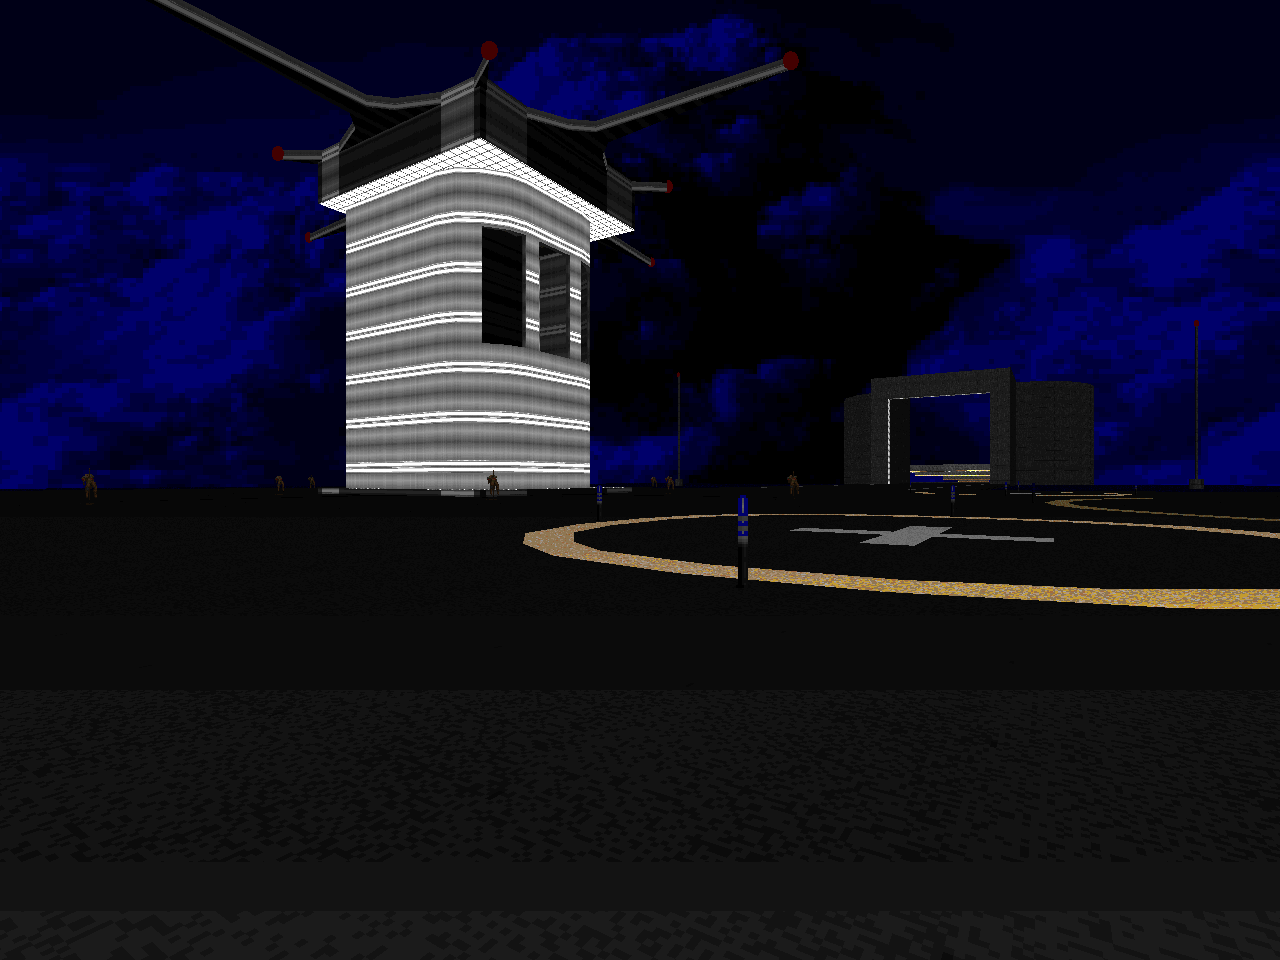 |
| MAP10 | |
|---|---|
 | The alien ship is a spooky, cavernous structure highlighted with a haunting soundtrack. The atmosphere is superb but the real tension comes from the fact that you're pitted against fifty-one lurking arch-viles. Sure, B.P.R.D. presses the plasma gun into your hand, but the ammo balance from scratch is razor-thin. You'll have to make every shot count and maybe even lure one away so that you can snag the big battery right before the eastern half. You'll also need to find both secrets; the single small cell early on is indispensable and seven rockets go a long way toward clearing the tower out the second time. The finale is a BFG blitz made tricky due to the way the archies are spread out in the command center. You'll have to splat enough to make the heat manageable so that you're done before the invul sphere wears off. Love the look, dig the survival horror, but not something I'll rush to revisit. |
| MAP11 | |
|---|---|
| Back to MAP08. It looks like the hub has taken even more of a beating... but wait! There's another chunk o' base torn out, leading to a network of caves! The typical shenanigans are livened up by starting out with the BFG and then moving on to some tense cave stalking as you pick your way through scattered Hell nobles and revenants, hunting the ultimate source of the disturbance. The cliffside combat is a nice change of pace; there's a very helpful shrine nearby provided you can chew through all the meat on the ledge that leads to it. The combat behind the barred door is more cinematic than anything since the arachnotrons are perfectly capable of occupying the Mastermind as you snag some cells for your no doubt exhausted BFG and the wall of flesh guarding the portal should be relatively easy prey for the following frenzy. A nice change of pace. | 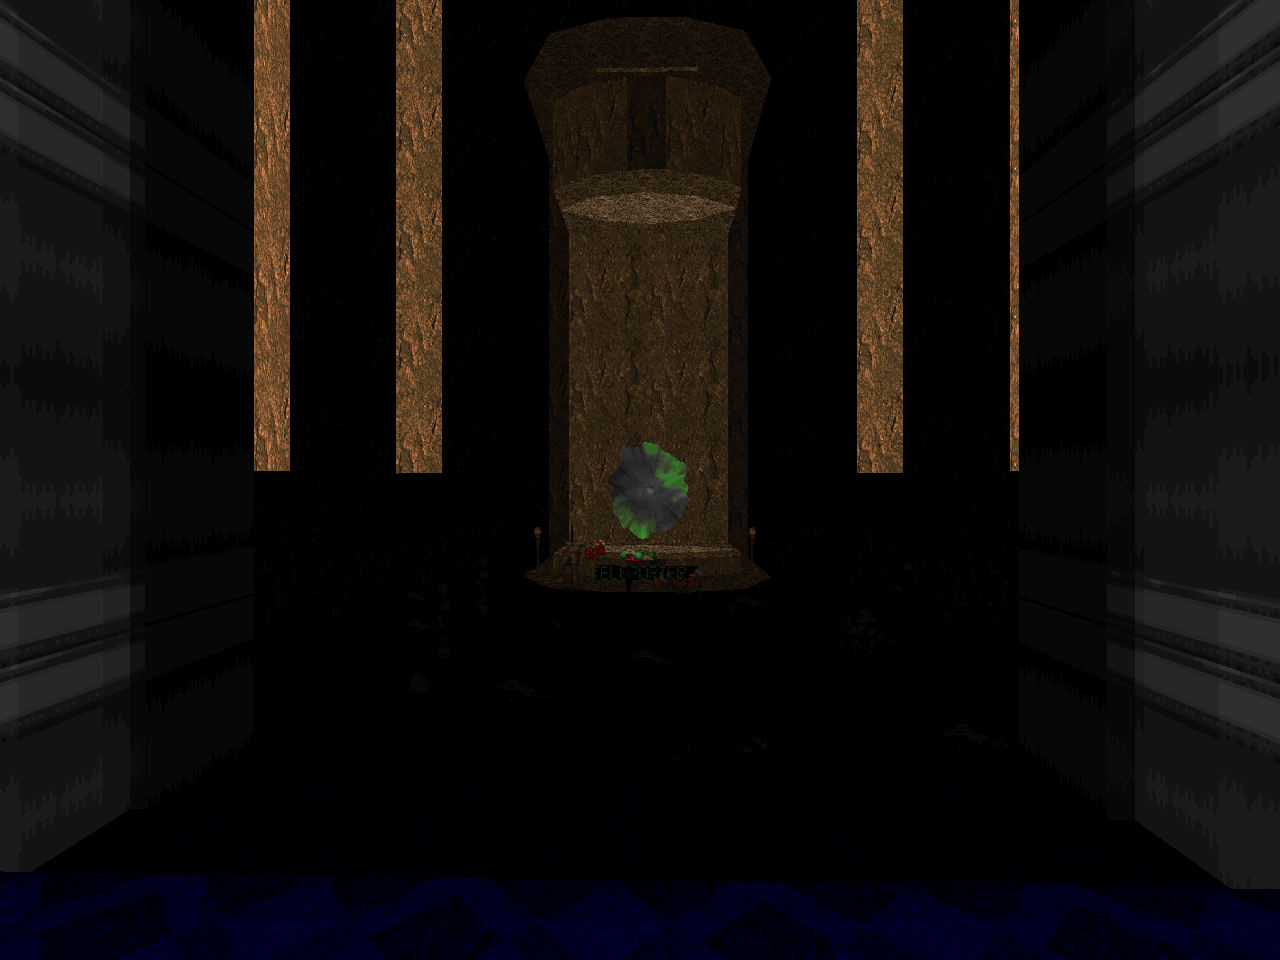 |
| MAP12 | |
|---|---|
 | Like MAP10, whatever you bring into this level will make a world of difference. You're on another world, too, a deep fraction of a barren alien planet. The start is pistol panic with various meaty snipers poised throughout the ravine and on top of the canyon walls including a brace of arch-viles on a very short step pyramid. Your first act will be to follow a narrow winding catwalk splitting two pits full of demons. This and the corpses hanging from the arch lead me to believe that B.P.R.D. did not have infinitely tall actors in mind when designing this or, really, any of Equinox's levels. It's okay, though, especially since it might save you from certain death in a pit / crusher trap. Bumping into horizontally invisible things is but an annoyance when compared to the level's action, highlighting survivalist-style gameplay where you maximize the potential of your meager ammo supplies. At least, until the Icon of Sin fight, which drops another BFG on your lap and then a few big cells once you've properly engaged. The architecture rising like a pop-up book is a neat visual. I really enjoy the spiral structure in the level's southeast section. |
| MAP13 | |
|---|---|
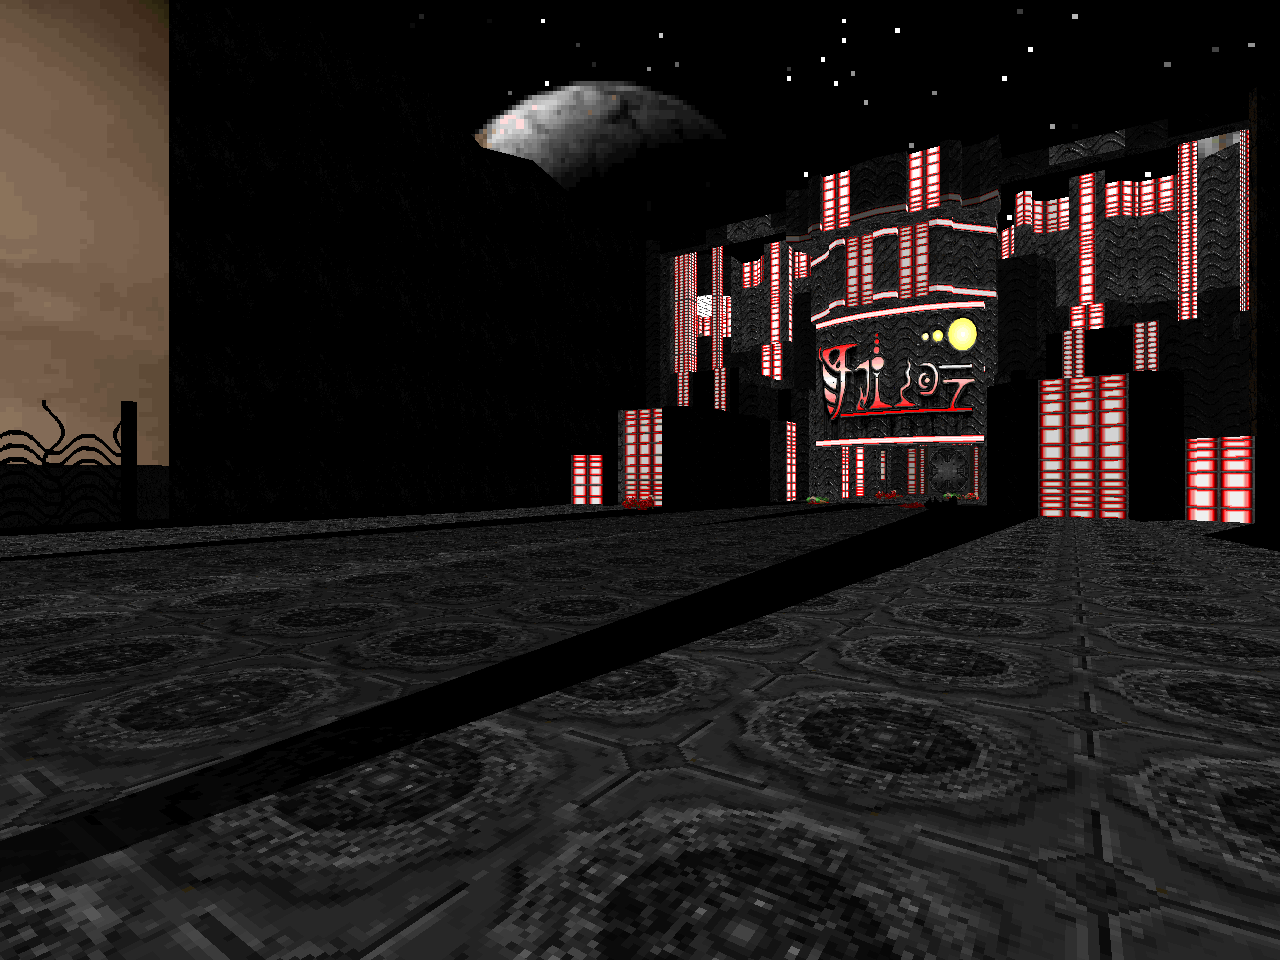
| MAP01 goes Moonside with the same general layout... up until the big finale. The parallels raise some interesting questions given that this alien architecture appears to be patterned after the Equinox facility. Presumably, the demo-aliens were more thorough in their reciprocal research than humanity. The initial assault is meaty given the high-HP foes and B.P.R.D. tightens up the progression by eliminating the lengthy hallways to the side areas, leaving a few simple (if ornate) rooms. The big surprise occurs when you enter the original exit area, wandering right into their ultimate trap. It's an enormous, dangerous crossfire caldera with a small ring of Spiderdemons up top and a much larger circle of Cyberdemons jutting out of the bottom floor. On the not-so-boss monster side there are imps and Hell knights located in the remote darkness of the outer edges and spoileriffic revenants among other fiends staffing the tower exterior. You're spared IoS respawning, at least, but you've still got quite a relay ahead of you as you've got to get to the foot of the tower to get the red key to access the four annexes in the level's periphery, some of which are punishing in their own right. Think stuff like crusher mazes and drop-down monster coffins. The final fight is a big ol' zerg flush with arachnotrons and revenants in a tiny room so have fun. Especially if you blew all your cells or didn't bring a BFG from a previous level. Flipping the switch won't be too hard but clearing the room and then doing it depends on how quickly you can kill the sole vile without getting boxed in. | 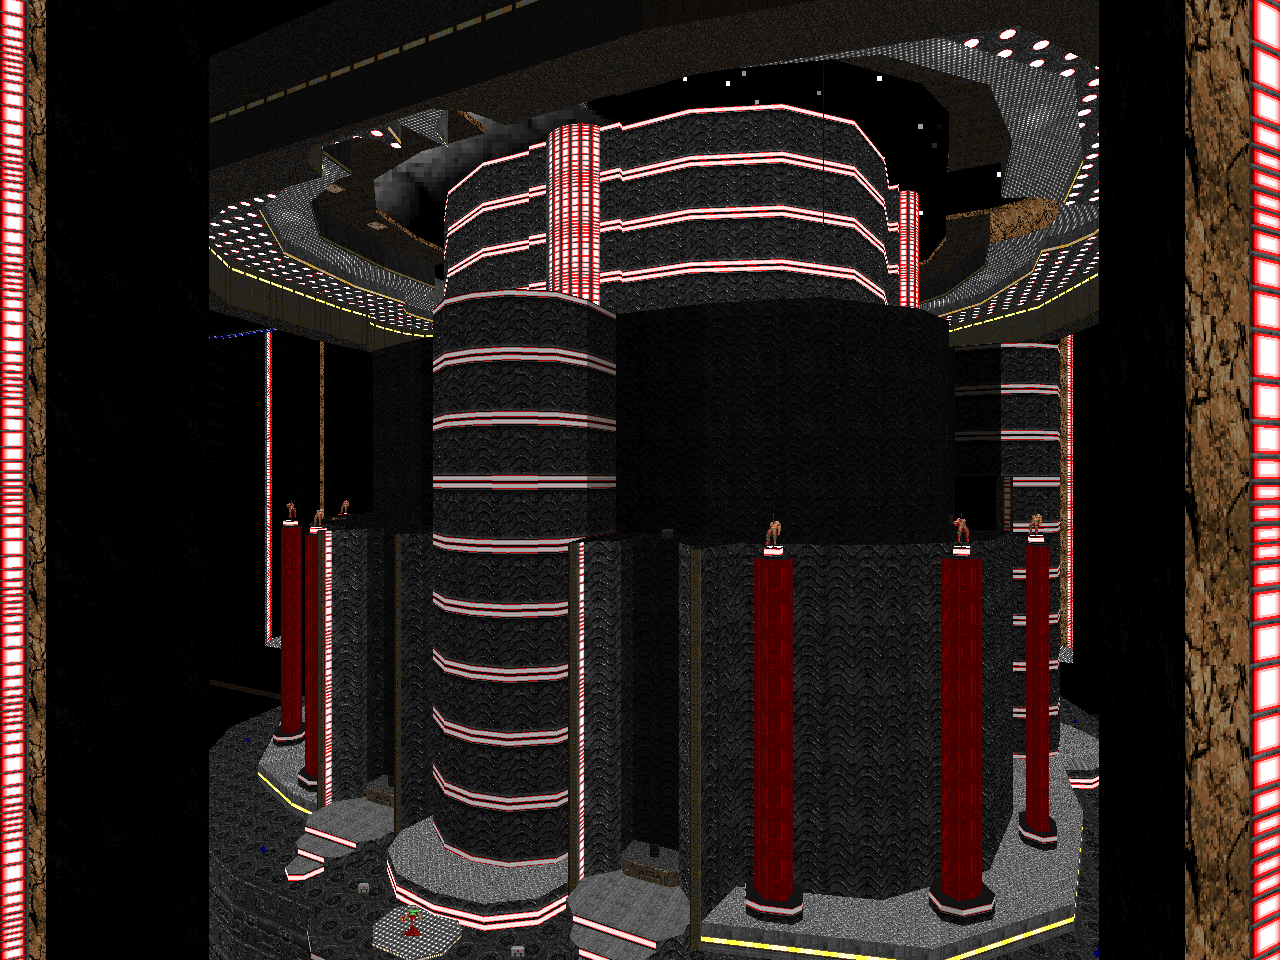 |
THE FIRST POINT OF ARIES
This post is part of a series on
Doomworld's Top 10 WADs of 2001
Doomworld's Top 10 WADs of 2001
| Sin City | SlayeR |
| Null Space | Doom Resurrection |
| The Darkest Hour | Equinox |
| Vrack2b | Phobia |
| KZDoom7 | TVR! |
MAP09 is seared indelibly in my mind. It just might have been my first slaughter experience. And that hovering UFO was mindblowing.
ReplyDeleteI remember reading some time ago about a spaceship lifting off, but in my mind it was in one of the Hell Revealed II levels. Then after playing Hell Revealed II, I thought it was in one of the Kama Sutra levels. Now I'm pretty sure that it was this bad mofo
DeleteOh my, I knew this was a nice-looking set from the bits and pieces I've played of it before, but never knew just quite the heights it reached until seeing these shots. The little hints of narrative near the ends sounds pretty cool too. Definitely gonna give it an honest play through sometime.
ReplyDeleteBy the by, the author made a commander keen mod starring and older and severely disheveled Billy Blaze called Commander Keen 58: Ruins of Roib.
B.P.R.D. is love.
Whoa! Glad to hear that B.P.R.D. is still modding games.
Delete"The levels themselves have no names. It is likely an oversight, as there are intermission graphics replacements included." -- DooM wiki. Anyone know if this is true? Because i don´t see anything like "unused intermission graphics" in anyplace :L
ReplyDeleteYeah, idk what Doomwiki is implying unless the reasoning is that B.P.R.D. went through the trouble of adding an Intermission background so surely he must have intended to add level title graphics as well
DeleteWhatever you do, don't turn off the lights. It's makes the entrance a bitch to navigate. Incidentally, anyone know a standalone flashlight/nightvision mod that actually works with the latest devbuilds?
ReplyDelete